Showing posts with label yarn. Show all posts

Sunday, June 20, 2010

Bashful Handspun Yarn

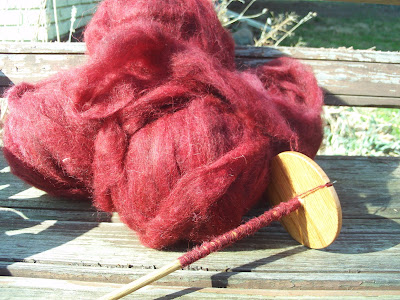
I am so excited! I just sold my first handspun skein on my new Michigan Spinning Etsy Shoppe! I purchased this Merino Alpaca Fiber from Jehovah Jireh Farm at the recent Fiber and Animals Fest held right here in Marshall on June 12th.

I call it Bashful and it was single spun on my Kromski Minstrel and measures 271 yds at 12wpi and now it's SOLD! YAY!


I am still working on Revamping the Studio. No pics yet, it is still a mess, but there has certainly been some progress. I hope to have it all completed tomorrow night, but we'll see what happens.

Still working on Stamp Orders. Every day brings more orders in and I am very thankful for each and every one and for the Lord's blessing and provision.

Lord willing, I will have some time tomorrow to card some new batts and add some more items to Michigan Spinning on Etsy.

Have a good night :)

Saturday, May 22, 2010

Wonderful Wool! Dyeing to Spin!

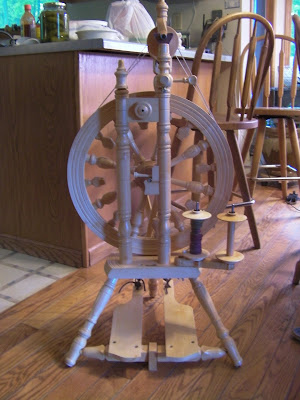
MY NEW KROMSKI MINSTREL! YAY!


My very first spinning wheel arrived on Friday afternoon and I gleefully assembled it and started spinning - yarn pics to follow at end of post. I am so excited to finally have a wheel. I am getting ready for my first Fiber Fest in June and so I really needed this wheel to spin up yarns for the show and to sell on My Etsy.

I also purchased my first Fancy Kitty Kitten Carder. This is the fine 90/120 carder, and I also purchased an auxiliary swift in the Medium cloth as well for carding some textured art batts. I am so excited. My auxiliary swift will arrive on Monday and then I will be carding batts like crazy!
This is my first hand dyed, hand pulled roving. I call it RARE EARTH, because when I saw the colors the first words out of my mouth were "Wow, it so earthy!" I also washed and prepped this fiber from the raw state. It is from a 80/20 Corriedale/Sussex mix breed whole fleece purchased from a local farm.
This is the very first yarn I have spun on my new wheel. It was made using the RARE EARTH hand dyed roving. I also added in some ribbon shreds and some ribbon roses. I just love it. I know I am just going to get hooked on spinning art yarns!

Here's a close-up!

And this is the roving I used. I had 2 batches of this dyed up for a total of 4.2 ounces. The final skein is 4.4 oz and 124 grams.

Here is the very first Batt I carded on my friend's Fancy Kitty before I purchased my own. I used the same Corriedale Sussex fiber, only this was the leftover bits from flick carding locks, and from pulling the rovings. I spun it up on my drop spindle and have not taken pics of the finished yarn yet.
This is the fiber I used to make the Batt above.

This is a pic of all the fiber I dyed that day. I dyed all this in about 30 minutes in between morning and evening service last Sunday.

Well, that's all I have time for right now, I can't wait to share some more Fiber Fun with you all. I plan to make some spinning and carding videos for my YouTube Channel once I get my drum carder on Monday. So STAY TUNED!

Tuesday, March 30, 2010

Raspberry Tweed

Here is a little bit of eye candy for the yarnies and fiber addicts (myself included), who frequent the blog and to the new visitors out there WELCOME! and enjoy :)

First off I must share the Antique Skein Winder I scored for $15 when I went to a local antique shop with my Grandma, Aunt and Cousin. I found this wedged behind a couple of old shovels and a wooden crate. At first glance I wasn't sure if it was what I thought it was, but when I heard it was only $15 on sale that day, I bought it on the spot. I used it already, to wind up the skein of Raspberry Tweed I finished spinning this weekend.

This is a skein I just listed on my Etsy today! I spun it up and plied it all on my top whorl drop spindle made by spinsanity on Etsy. It was spun from an Angora Merino batt I purchased from Wiley Woolies at the Fiber Fest at Cornwells Turkeyville this past fall. It is 294 yds of a heavy worsted / light bulky weight yarn weighing in at 5.4 oz / 150 grams. I am in a little personal competition with my cousin who fills her spindle to such capacity I have yet to surpass her in total yardage of a single skein. I thought for sure I would do it with this skein, but her last skein was 295 yds! I missed it by 1 yd! She also told me that she found some extra fiber after plying her skein and if she had been able to add that in she was sure she could have hit 300 yds in a single skein. WOW! Her success with spinning keeps me striving to excel in my own abilities. Someday I would like to own a wheel to make spinning faster, but there is a real sense of satisfaction knowing that this HUGE skein of yarn was spun up on a humble little stick and whorl!


Now that spring is here, I am pulling out all kinds of roving and fiber that has been stored away during my winter knitting phase. The Holidays really wiped me out with all the knitting they required. Now I can get back to a relaxed pace of spinning, knitting and sewing. Currently what is keeping me busy is spinning and knitting, sewing only falls in here and there when I get a free moment from everything else.

So currently, almost all of my spindles have fiber on them. I am spinning up some more flax. I have 4 ozs of flax fiber that I spun just a small amount of last summer, I navajo plied it, and then it sat around in a tiny skein (I think about 90 yds) for this past year while I was a gloomy gus, disappointed with how much it resembled a bunch of sticks in color and texture. Well, I finally pulled it out and decided I was going to knit something with it and see if it would really soften up like I have read and been told, that it would. Surprise Surprise! I am knitting a napkin, yes.....a napkin in a basic stockinette with a garter stitch border this yarn has gotten softer and softer the more I knit with it. I can only imagine how much softer it may get once the napkin is done and I launder it a few times. So I have been encouraged by this little bit of knitting to spin up the rest of the flax and maybe make something a little bigger than a napkin with the finished yarn.


I am also spinning a bit of australian merino wool that I Hand dyed when I was visiting with my cousin a few weeks ago. You can see her hand dyed rovings on her blog at Holly Marie Knits. Here is just one of mine currently on the spindle. We have just been practicing our dyeing with some Wilton Icing Dyes, but I plan to purchase some Greener Shades Dyes for my next batch of fiber dyeing coming up in a couple of weeks.


And....I am just starting to spin a burgundy batch of Merino/Alpaca fiber I purchased from Jehovah Jireh Farm at last years fiber event at Cornwells Turkeyville in Marshall Michigan. My grandmother wants a wimple like the one I knit for my cousin and so I thought this would make a nice yarn for it if I spin it up lace weight. The pattern Ice Queen from Knitty.com


Well, I'd love to stay and chat a while more, but with all the photos this post has taken me longer than I anticipated. The new women's bible study with the ladies from my church starts tonight and I need to get a move on or I will be late! More updates to come later this week........(including some video of fiber dying and a knitting tutorial for one of my patterns)


Sunday, February 14, 2010

Little Lace Shawl

I just had to share this little lace shawlette I made this weekend. I absolutely love it. After I finished spinning up my Summertime yarn, I wanted to find something small that might only use 1 skein of yarn and so I logged into Ravelry and started searching. What I found was a simple, easy to knit pattern for this little lace shawlette called 198 yds of Heaven designed by Christy Verity. This is a free pattern and you can download it directly from Ravelry. It is not really a beginner pattern, because it assumes the knitter has some prior experience with triangular shawls and their construction and so it does not give any directions for the sequence of knitting the repeats of each row. With a little help from my cousin Holly and some trial and error I was able to figure out the row repeats and once that clicked, I did not have any further trouble knitting the rest of the shawl. It is a little involved for the novice knitter, but I highly recommend it and you can always ask someone for help getting started on the row repeats to make sure you do it right. I am certain this will be my favorite shawl pattern forever, and I will knit them all year long, gift them to friends and family, and make them in colors to go with every season and every dress I own. They will be house shawls and church shawls, and just going out shawls. There will always be a reason for me to pick up some sticks and string and get to knitting another little shawlette.

This little shawlette is being gifted to a friend and I am delivering it to her personally when I visit her this afternoon:)

Thursday, February 11, 2010

Summertime Yarn and Fibery Goodness!


This is my first foray into hand painting fiber. Forgive me if I use this term incorrectly as I am just beginning my journey into dyeing fiber for spinning. I have a short little video I will be uploading to YouTube that shows my dyeing process for this particular fiber. As this was my first attempt, I felted the fiber slightly during the dyeing process, I think it was the intense heat of microwaving that did it because I was very gentle with the fiber throughout the process. I really abhor microwaving. I have since thought of a new method of steam/heat setting the color on the stovetop that I will employ during my next batch of dyeing. I will let you know how it turns out.

For the fiber shown here I used Wilton's Icing Dyes, and I purchased small refillable plastic squeeze bottles for housing the dye mixture during dyeing. For this above roving, which is Lincoln Top that I purchased locally, I mixed 1/4 tsp of each of the following colors (green, lemon yellow, pink) in their own bottle with a TBS of vinegar and filled the rest of the bottle with warm water.

Then I laid approximately 4 oz of fiber (This one ended up being about 5.2 oz) in a snake pattern on the tabletop which I had covered with towels and sheets of plastic wrap. Then I proceeded to squirt the dye upon the fiber in a striping pattern, up and down vertically, alternating colors until I had used up all the dye. I then folded in the outer edges if the plastic wrap and starting at the top, I rolled the roving down towards my end of the table in a long tubelike fashion. when I had it all rolled up, I then circled the tube into a donut shape, put it in a glass dish and microwaved it for about 2-3 minutes. Then I let it cool before I unrolled it. The result is as you see above and below.

And this is what it looks like spun up into a yarn. I have not wrapped this yet to gauge its weight, I think it will be around a sport or worsted weight. The colors are more subdued than in the unspun roving. I really like this yarn. I have set the twist already and am just thinking of what I might knit with it. I call it Summertime, because it reminds me of fresh green grass, sunshine, and the shades of summer fruits like pineapple, honeydew, mango, papaya, watermelon and pink grapefruits. I could jump right through spring and into summer.... no problem:)

I ended up with more singles on one bobbin than the other, and so I spun the last little bit into its own small skein. The large skein is 189 yds and the small one is 52 yds, so 241 yds total. Not bad for about 5 oz of fiber. It should be enough for a simple little project.

I plan to check out Ravelry later today to see if something appeals to me. I want to start knitting with this over the weekend.

These are the rest of the fibers I dyed that same day. Each is approximately 4 ounces.

This one I call Peachy-keen. I used 1/8 tsp of pink and brown and mixed each in its own bottle with 1 TBS of vinegar and the rest warm water. (I used 2 bottles of each)


This one I call Calypso, and it was made using 1/4 tsp of aqua, 1/8 tsp aqua, 1/8 tsp of brown each in their own bottle with 1 TBS of vinegar and warm water to fill.

This one I call Eggplant, because as soon as I unwrapped it the purple just jumped out at me and I exclaimed, ooohh it looks like eggplant! This was made with 1/4 heaping tsp black, 1/4 tsp red, 1/4 tsp brown each mixed in their own bottle with 1TBS vinegar and warm water to fill. I was uncertain how this one would turn out because I knew the black would not really be black at all, I was amazed at the final results. The black turned shades of brown, purple and green and blended with the other brown and the red, and the red softened in spots into a soft mango color. This is my absolute favorite of all of them. I think I will spin this next.

I have traded some of my hand carved stamps for 16 oz of undyed merino roving. I hope to receive it within the next few days. I plan to purchase some new Greener Shades Dyes that I just discovered at Pancake and Lulu on Etsy. They come in 9 shades and can be blended to attain different shades and hues, and conform to the Organic Trade Association standards for Organic Fiber Processing.

I hope to do alot more dyeing in the future. I recently washed a whole Icelandic natural white (ecru) fleece that I purchased this fall at a fiber festival in the hopes of doing some dyeing once I get it combed and prepared.

I also just finished washing a natural black Icelandic fleece that I bought at the same festival. I have to comb this one too. I plan to sell some and spin some for my own use. We will see how it turns out. It has quite a bit of veggie in it still, little pieces of grass and straw and a bramble here and there. It is a ram fleece and it had to go through 4 hot water soaks in the tub before my house stopped smelling like a barn.

Sunday, November 1, 2009

Novelty Yarns - The Drop Spindle Method

Well, Sorry I have not been updating the blog lately. I spent the summer at my parents in SC and just returned home in September and I have been swamped trying to get all my things put away and catching up on Etsy orders and making ready for all the holiday spinning and knitting. I should be posting regularly now that I have gotten back into a normal routine.

ALSO......I have started a podcast. My first episode was in July, and I just uploaded Episode 2 last week. You can find the podcast and show notes here and it is also available for free download on iTunes. Just type in Spinsterknits in the search bar and you will find it.

Since returning home I have made some new friends at a fiber festival I attended in the beginning of October. I now meet with the ladies every Monday night for spinning and socializing. They all spin on a wheel, but sadly I am still a spindle spinner until I am able to purchase my own wheel. I did test a couple at the festival though. I am really liking the Ladybug wheel.......ALOT!

One of the girls I spin with on Mondays has the book "Intertwined - The Art of Handspun Yarn, Modern Patterns, and Creative Spinning". You can find it here I was able to browse it briefly on 2 occasions and finally decided to request it from my Library. It came in on Thursday and I am in Total and Complete Love with this book. Some of the yarns and projects are a little too OUT THERE for my taste, but the techniques are fantastic. I am still reading the book and all the different step by step details of each technique, but the book is designed with the Spinning Wheel in mind and not really the drop spindle. I am determined that I can spin just as many interesting and unique yarns on the drop spindle as can be spun on the wheel so I opened up the book, pulled out my wools, fibers,bits and pieces of handspun yarns,and my hand carders and went to work making some CRAZY BATTS as described on pgs 64-67.

Basically, for the yarn pictured (total yield= 93 yds in 3 skeins), I made 22 mini crazy batts by loading one carder with some grey wool (my mother bought it at a festival as a mill carded batt and she has no clue what the fiber is, the farm she bought it from raises Icelandic sheep and Llamas, so its a 50/50 guess as to what it is), and then I laid out bits of leftover pieces of handspun yarns from other projects in green, teal, pink and orange. On top of that I added pieces of hand dyed yellow and watermelon colored German Angora, and then topped that off with some hand dyed light blue Corriedale wool. Then I hand carded the mass onto the empty carder and then onto the other carder before pulling it off and rolling it up, ready for spinning. The idea is to lightly card the fibers so that they retain their lumpy, bumpy,unmixed textures. Then you spin it up fast with minimal drafting allowing the fibers to clump and shape into a thick and thin kaleidoscope of color. To finish I plied the yarn with a silver metallic crochet thread. I really like the end result and have already made some sketches for a new pattern I am designing especially for this yarn. I will be working on that project this week.

Now,some tips on the spinning process. Because you are spinning these batts up with minimal drafting it takes a little time to get the feel for the technique. A wheel will continue to spin as you treadle, but the spindle doesn't spin as long when you are barely drafting and basically overspinning the fiber. You have to keep a closer eye on the spindle so it doesn't change direction and undo all your hard work, and it is easier when you wind on every 12 inches or so instead of spinning until your spindle touches the floor. I spun up all 3 skeins in just a few hours. They were much faster to complete then I expected.


I will definitely get some pics and maybe even some video of the entire process for anyone who is interested in a step by step demonstration of how I made this yarn.

Over the next 2 weeks I plan to try out several more techniques in this book with my drop spindle to see how they turn out. Even though some of the projects are a nothing at all like items I would actually wear or yarn I would actually use, this book is a MUST HAVE on my Christmas list because the techniques can be used to make a wide variety of yarns to fit any person's style.

Happy Spinning:-)

Sunday, August 23, 2009

Hand Dyed, Hand Spun, Hand Knit Mitts


I fell in love with these mitts when I saw them in the IK Fall 2007 Issue and knew that one day I would knit them.

2 years later........I finally have!
I hand dyed the colorwork wools with Wilton Icing Dyes and spun them up in small batches to make the mitts. The body of the mitts is knit with a worsted natural gray handspun wool. My mother purchased a batt of it at a recent fiber festival in my hometown, sadly, she does not have the label telling what kind of wool it is. I can tell you it is a little bit coarse, but not scratchy, and it was a bit tricky to spin, as it was carded into a huge batt at the mill and the fibers are very short bits and pieces. I had to pull the batt in several directions to loosen up the fibers for drafting, I then rolled it loosely like a rolag and folded it gently in half so it formed a V shape. then I drafted it from the tip of the V which pulled the fibers sideways across each other, this seemed to help them twist more firmly together. I am a fairly new spinner, so if there is a specific name for how I drafted this I don't know what it is, but I would love to hear it if you do.
I measured out 2.25 ounces of this wool and spun up 90 yards of worsted weight yarn.
The yarn used for the colorwork is as follows:

Red 3o yds handspun 12 wpi
Orange 1o yds handspun 12 wpi

Teal 11 yds handspun 12 wpi
* I used this in the center colorwork of the 2nd mitt when I ran out of the red.

Salmon 15 yds handspun 12 wpi
Lime Green 27 yds handspun 12 wpi

lt pink 7 yds handspun 11 wpi
* I only used a very small portion of this yarn on the top portion of the 2nd mitt because I ran out of the Salmon color. The colors are so close that you almost can't tell the difference unless you really look closely at them together.
I really like the slight differences that resulted in the 2nd mitt due to the color changes. I knit these mitts over a few days. Each one took about 12 hours. I CO in the evening for the first mitt and knit for 6 hours. I picked it up again at 7am the next morning and knit until 1pm. The first mitt was finished. The majority of the second mitt was knit in a single day. I knit 27 rows from the CO edge in the evening and then picked it up again at 6am the next day and knit for a few hours in the morning, and then I knit again in the afternoon until the mitt was finished. I think the second mitt actually went a little faster, but since the first one was 12 hours of knitting I figured it would be safer to estimate 24 hours for the whole project.

I like these mitts so much, I think I will make them again in different colors. My mom wants a pair and I am sure my daughter would love a pair too.

The pattern for these mitts can be found on Ravelry here Interweave Knits Composed Mitts

Happy Knitting!

Tuesday, August 18, 2009

Dye Spin Knit Felt


Lately I have really been into felting Knitted projects. So much so, that I have made several felted patterns and made them available on Ravelry (I still have a frog toy to write up and post though). While browsing Etsy the other day I came upon many needle felted items, mostly adorable little animals. I have a needle felting tool that my mother sent to me and I decided I really wanted to make some little needle felted animals and things.

THE HUNT FOR FIBER WAS ON!!

Well, I am visiting my parents in SC right now, and I knew that anything I purchased on Etsy probably would have to go to my house in Michigan because I was going to be heading home soon, and I am very much a "Spur of the moment" kind of crafter. Once I get something into my head, I want to do it right now and waiting around for items in the mail is NOT an option.
So I took a trip down to Hobby Lobby to look at their needle felting roving packs. They really didn't have anything of interest. While I was there my Mother wanted me to check out the baking and Cake decorating aisle for those nifty silicon muffin molds (She uses them as soap molds because they are easy to manipulate and release the soap better). Well, sadly for her, they did not have any of those silicon molds, but goodie for me, I spied some wilton gel colorings in little jars and had an epiphany!

At 1.49 each, I grabbed up 8 jars of various colors and headed to the checkout.

Once back at the parents, I pulled out about 12 oz of natural ecru fiber I had been hoarding. 4 ounces of Romney and 8oz of BFL. I pulled it into shorter lengths and soaked it in a bowl in the sink for about an hour, until it was heavy with water and there were no dry spots left.

There are numerous posts online if you do a google search for "dyeing fiber with Wilton Dyes" too many to list them all, but I really liked this one by PieKnits.

I did not really write down measurements for this first attempt at dyeing. My goal here was to dye up the fiber I had for my own personal use, so I really just jumped right in and played around with it.

And this is what I did:

I put 3 separate saucepans on the stove top, each with 4 cups water and 1/2 cup white distilled vinegar. I brought the water and vinegar mixture to a boil and then reduced the heat to simmer.

I used a butter knife to measure out a small bit of Wilton Dye from the jar. Basically I covered about a 1/4 inch of the knife tip with dye from the jar. The dye is like a thick paste, so I mixed it with some boiling water in a small glass pyrex dish (very small custard style cup) until it was well dissolved. Then I added this color mixture to the pot of water and vinegar on the stove and stirred it in. I mixed a different color in each pot.

Now I took my bowl of soaking roving and poured it out into a colander. Then I removed each length of roving, one at a time, gently squeezing out the excess water and laying the roving on a small towel I had opened up on the kitchen counter.

Once all the roving was ready I put 1 short length into each pot. Now I just waited a few minutes, spooning the fiber up out of the water to check the saturation periodically. It really did not take more than maybe 5 - 15 minutes for the fibers to be well saturated with color. Many times the fiber would suck up all the color in the pot and the water would be clear once the fiber was removed. When that happened, I would just add more color and more wool to repeat the process. If there was color remaining in the pot when the wool was removed, I would simply place new length of wool in the pot to use up the remaining color. This is how I was able to get varying shades of the same color. As I went along, I became more confident and started mixing colors in the pot to try and achieve different shades. (I will be dyeing more fiber soon and will post detailed instructions on mixtures for the colors I achieve).

Once I spooned the fiber out of the dye pot, I would let it sit in a colander in the sink to cool for a few minutes and then I would rinse it with warm water until the water ran clear. I would gently squeeze the excess liquid from the fiber, shake it out a little bit to fluff it, and then hang it outside to dry.

And here are the results for my afternoon of dyeing fiber!
I used a little bit of the colored rovings to needle felt this little Mother Hen and her Chicks
and these 3 little piggies
And then I decided to spin up the wool I need to knit the Composed Mitts from Interweave Knits Fall 2007 Issue Here is the link to the Composed Mitts Pattern Page on Ravelry.

These are the mini skeins I spun up last night for the bits of color.
I am still spinning the natural lt gray to use for the body of the mitts. I am currently using my US4 Addi Turbo 40 inch circular to knit the Dream Twister Socks 2 at a time, so I will have to buy another pair to knit these mitts 2 at a time.
Next post will be an update of the ongoing Toe Sock Project and more knitting WIP.
Happy Knitting, Spinning and Felting:-)